How to Clean Old Soil From Pots Before Reusing Them
Cleaning old soil from pots helps prevent drainage problems, salt buildup, pests, and diseases from carrying over to the next planting. Even an empty pot can hold old roots, compacted mix, fertilizer salts, algae, fungal spores, pest eggs, and debris around rims or drainage holes.
You do not need to sterilize every pot every time. A pot that held a healthy annual usually needs only basic cleaning. A pot that held root rot, fungus gnats, mold, or an unknown disease needs more care. The basic process is: empty the pot, inspect the soil, wash the container, disinfect if needed, dry it, and refill with suitable potting mix.
Why Old Soil and Dirty Pots Need Attention
Old potting mix breaks down as peat, coir, bark, compost, and other ingredients become finer and more compacted. That reduces airflow around roots and slows drainage. Fertilizer salts can also collect as a white crust, especially in houseplants, self-watering pots, and containers watered with hard tap water.
Dirty pots may carry pests or disease. Old roots and damp debris can shelter fungus gnats, ants, slugs, mealybugs, larvae, or pathogens. Terracotta and unglazed clay need extra attention because they are porous. Plastic is easier to clean, but soil often sticks in rims, seams, and drainage slots.
When a Quick Clean Is Enough
A quick clean is usually enough when:
- The previous plant was healthy.
- The soil smells earthy, not sour or rotten.
- There were no serious pest problems.
- The pot has no heavy salt crust, algae, or mildew.
- You are replanting with a hardy outdoor seasonal plant.
Empty the pot, remove roots and debris, wash with warm soapy water, rinse well, and let it dry.
When You Should Deep Clean or Disinfect
Deep clean or disinfect when:
- A plant died suddenly or from suspected disease.
- Roots were black, mushy, or foul-smelling.
- You saw fungus gnats, scale, mealybugs, spider mites, ants, slugs, or larvae.
- The pot has mold, algae, or heavy mineral crust.
- You are reusing it for seedlings, cuttings, herbs, or valuable plants.
- The container sat outside with wet soil for months.
Always wash before disinfecting. Soil and organic matter reduce the effectiveness of disinfectants.
Cleaning, Soil Reuse, and Replanting Steps
Work outdoors or over a tarp if possible. The safest sequence is to empty, inspect, wash, disinfect if needed, dry, and refill.
Remove and Inspect the Old Soil
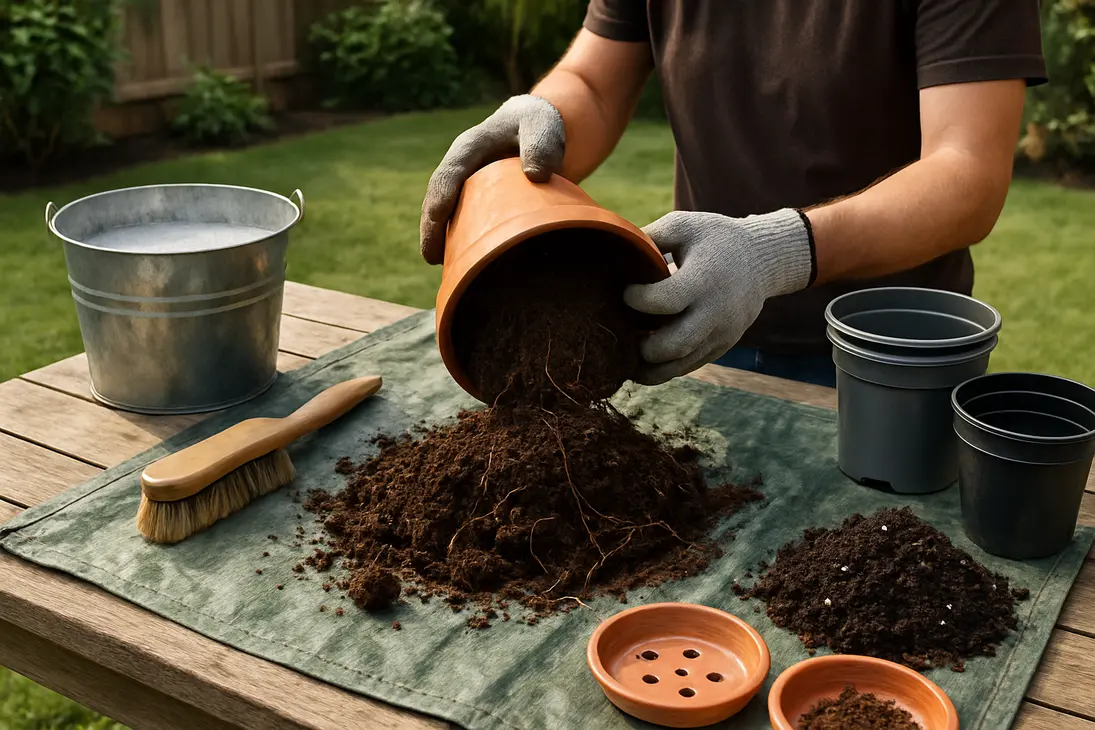
Turn the pot on its side and slide out the root ball. Cut back stems first if needed. Squeeze flexible plastic pots gently, or tap rigid pots with your hand or a rubber mallet.
Inspect the soil and roots before deciding whether to reuse the mix. Watch for:
- Dense circling roots
- Insect larvae, ants, slugs, or webbing
- Sour, swampy, or rotten odors
- Mushy or blackened roots
- White salt crusts
- Fuzzy mold
- Dense, sticky, or waterlogged texture
An earthy smell is normal. A sour or rotten smell usually means the mix stayed too wet and should not be reused in a new pot.
How to Loosen Dried or Compacted Soil
Old mix can dry into a hard block, especially in terracotta pots. Avoid sharp tools that could crack the container.
Try this:
- Soak briefly. Add water or set the pot in a tub to soften the mix.
- Loosen the edge. Use a plant label, butter knife, paint scraper, or old trowel.
- Tap the sides and base. This helps release the root ball.
- Break it apart by hand. Wear gloves if there may be pests or mold.
- Clear drainage holes. Use a chopstick, pencil, or small brush.
For large containers, remove soil in sections instead of lifting one heavy wet mass.
What to Do With Root Balls and Plant Debris
Healthy roots, stems, and spent annuals can usually be composted if they are not diseased and have not gone to seed. Shake loose usable mix from the root ball first.
Do not compost diseased, badly infested, or rotten material unless you manage a hot compost system carefully. For most gardeners, it is safer to bag and discard questionable debris. Remove plant tags, mesh plugs, nursery foam, fertilizer clumps, and old drainage screens before washing.
When to Discard Old Potting Soil
Discard old potting soil when:
- The previous plant had root rot or an unexplained disease.
- The soil still smells foul after drying.
- You see many pest larvae or persistent fungus gnats.
- The mix is slimy, sticky, or mud-like.
- It is packed with dead roots.
- It was used with chemicals you do not want near edibles.
- It has been reused several times and drains poorly.
If the mix is not diseased, spread it thinly in an ornamental bed, add it to compost, or use it in non-food garden areas. Do not rely on exhausted old mix as the main medium for new container plants.
Wash the Pot Thoroughly
Washing removes grime that disinfectants cannot penetrate. It matters for plastic, clay, ceramic, and metal pots.
Basic washing process:
- Scrape out loose soil.
- Soak in warm water to soften residue.
- Scrub the inner walls, rim, saucer, and drainage holes.
- Use mild dish soap if needed.
- Rinse thoroughly.
- Repeat if crust, algae, or soil remains.
Use a stiff brush for terracotta and outdoor pots. A toothbrush or bottle brush helps around drainage holes and decorative grooves.
Cleaning Plastic Pots
Plastic pots are easy to wash but can crack when brittle or cold. Squeeze flexible nursery pots to loosen soil, then scrub with warm soapy water.
Focus on rolled rims, bottom corners, drainage slots, label adhesive, and creases. Avoid harsh abrasives because scratches hold dirt. Recycle or discard cracked, sun-damaged, or brittle pots.
Cleaning Terracotta or Clay Pots
Terracotta often develops white mineral deposits as water evaporates through the clay. Light buildup is common, but heavy crust can signal hard water or excess fertilizer.
To clean terracotta, brush off loose soil, soak in warm water, scrub with a stiff brush, use vinegar on mineral deposits if needed, rinse very well, and dry fully. Because clay is porous, do not soak it in strong cleaners longer than necessary.
Cleaning Ceramic, Glazed, or Metal Pots
Glazed ceramic is usually easy to clean, but check for cracks, especially after freezing weather. Cracks can trap soil and worsen after watering.
Clean metal containers gently to avoid damaging protective coatings. Dry them promptly to reduce rust. If a metal or decorative pot has no drainage hole, clean the base where standing water and algae collect.
Disinfect Pots Before Replanting
Disinfecting is useful after disease, pests, or long storage with damp soil. It is also wise before starting seeds, rooting cuttings, or potting valuable plants.
Wash first, then choose a disinfecting method based on risk and pot material.
Best Disinfecting Methods for Garden Pots
| Method | Best for | Notes |
|---|---|---|
| Diluted household bleach | Diseased plants, seed trays, high-risk reuse | Effective after washing; rinse and air-dry |
| Vinegar solution | Mineral deposits and terracotta salt crusts | Useful for salts; not the best disease disinfectant |
| Hydrogen peroxide | Light sanitation of clean pots | Works best on already-clean surfaces |
| Hot soapy water only | Healthy previous plants | Often enough for routine reuse |
Use diluted bleach according to the product label, wear gloves, and work in a ventilated area. Never mix bleach with vinegar, ammonia, or other cleaners. Vinegar helps with mineral crust, but it is not a guaranteed disinfectant for pots that held diseased plants.
How Long to Soak Pots
For routine washing, soak only until debris loosens, often 10 to 30 minutes. For disinfecting, follow the cleaner’s label. Many gardeners use a short bleach-solution soak after scrubbing, then rinse well and air-dry.
Terracotta may need a longer plain-water soak before scrubbing and extra drying time afterward. For large pots that cannot be soaked, scrub clean, apply disinfectant to all interior surfaces, keep them wet for the required contact time, then rinse.
Safety Tips for Bleach, Vinegar, and Other Cleaners
- Wear gloves.
- Work outside or in good ventilation.
- Never mix bleach with vinegar, ammonia, or other cleaners.
- Keep children and pets away.
- Rinse pots thoroughly.
- Let pots dry before replanting.
Avoid degreasers, scented cleaners, and harsh residues inside containers where roots will grow.
Reusing or Refreshing Old Soil
Cleaning the pot is only half the job. Decide whether the old soil should be reused, refreshed, repurposed, or discarded. Potting mix loses structure and nutrients over time.
Can You Reuse Old Potting Soil?
Yes, if the previous plant was healthy and the mix still drains well. Reuse is usually safer for outdoor ornamentals than for seedlings, herbs, vegetables, or sensitive houseplants.
Reuse soil only when it:
- Smells earthy
- Has no major pest activity
- Is not slimy or compacted
- Drains reasonably well
- Came from a healthy plant
- Has been cleared of roots and debris
For valuable indoor plants, fresh mix is often worth the cost because reused mix can contain salts, poor structure, or hidden pests.
How to Refresh Tired Potting Mix
If the mix is basically healthy:
- Remove roots and debris.
- Dry and air it out.
- Blend with fresh potting mix. A half-and-half blend is a practical start.
- Improve drainage if needed. Add perlite, pumice, coarse bark, or another aerating material.
- Add nutrients carefully. Use compost or controlled-release fertilizer at label rates.
Do not keep adding fertilizer to old soil without considering salt buildup. Fresh mix plus modest feeding is safer than trying to rescue exhausted soil with heavy fertilizer.
Should You Bake or Sterilize Old Soil?
Baking potting soil is often suggested online, but it is rarely the best choice. It can smell unpleasant, heat unevenly, and change the mix. It also does not fix compaction, fertilizer salts, or poor drainage.
If a pot held a diseased plant, replacing the mix is simpler and more reliable. If you need sterile media for seeds, use fresh seed-starting mix instead of sterilizing old soil.
Fixing Odors, Mold, and Poor Drainage
A bad smell usually means the soil stayed too wet and airless. Empty the pot, break up the mix, and let it dry. If the odor disappears and the mix looks normal, reuse it outdoors after blending with fresh, airy ingredients. If it still smells sour or rotten, discard it.
Light white surface mold is often a moisture issue. Remove the top layer, improve airflow, water less often, and use a better-draining mix. Mold with foul odor, mushy roots, or plant decline is more serious.
If water sits on top or the mix stays wet for days, add aerating material or replace it. Do not use dense garden soil as the main filler in pots because it often compacts and suffocates roots.
Preparing Clean Pots for New Plants
After washing or disinfecting, rinse well and let pots air-dry in a clean place. Sunlight and airflow help, but avoid leaving brittle plastic in intense sun for long periods. Store cleaned pots upside down or loosely stacked so water cannot collect.
Check Drainage Before Replanting
Check every drainage hole before adding soil. Old roots, pebbles, mesh, and compacted mix can block water.
If a decorative container has no drainage hole, use it as a cachepot. Keep the plant in a nursery pot inside it, remove the inner pot for watering, and empty standing water afterward. Planting directly into a sealed container is risky for most plants.
Use the Right Potting Mix
Use potting mix, not ordinary garden soil, for most containers. Garden soil can become too dense in pots and keep roots too wet.
Match the mix to the plant:
- Houseplants: indoor potting mix, adjusted with perlite or bark if needed
- Succulents and cacti: gritty, fast-draining mix
- Vegetables and annuals: outdoor container mix
- Seedlings: fine seed-starting mix
- Orchids: bark-based orchid mix
Fill the pot loosely, water once after planting to settle the mix, and top up if needed.
Store Empty Pots Clean and Dry
If you are not replanting right away, store pots clean and dry. Leaving old soil in empty containers over winter invites pests, mold, mineral buildup, and compacted blocks of soil.
Good habits:
- Empty pots at season’s end.
- Brush or wash before stacking.
- Dry completely.
- Store terracotta where it will not freeze while wet.
- Keep saucers with matching pots.
- Avoid stacking damp pots tightly.
Conclusion
To clean old soil from pots, remove the mix, inspect it for pests, odors, roots, and disease signs, then decide whether it is safe to reuse. Wash the pot with warm soapy water, scrub away residue and salt buildup, and disinfect when the previous plant was diseased, pest-ridden, or unknown.
Let the pot dry, check drainage holes, and refill with fresh or properly refreshed potting mix. When in doubt after root rot, foul smells, or heavy pests, discard the old soil and give the next plant a cleaner start.
FAQ
Do I need to remove all old soil from a pot before reusing it?
Yes. Empty the pot, remove roots and debris, and wash away stuck-on soil. If the previous plant was diseased or pest-infested, remove all soil, scrub carefully, and disinfect before replanting.
Can I clean plant pots with vinegar instead of bleach?
Yes, vinegar can help clean pots, especially terracotta with white mineral deposits. It dissolves salt crusts and light grime.
For pots that held diseased plants, diluted bleach is generally more dependable when used properly after washing. Do not mix vinegar and bleach.
Is it safe to reuse soil from a dead plant?
It depends on why the plant died. If it died from drying out, age, neglect, or normal seasonal decline, and the soil smells normal and drains well, you may be able to refresh and reuse it.
If the plant died from root rot, disease, severe pests, or an unknown cause, discard the soil.
How do I get rid of bad smells in old potting soil?
Empty the pot, remove dead roots, and spread the soil out to dry and air. If the smell fades and the mix looks healthy, blend it with fresh potting mix and extra aeration for outdoor use.
If it still smells sour, rotten, or swampy after drying, throw it away.
You Might Also Like