Do Plastic Bottle Dripper Systems Work for All Potted Plants?
A plastic bottle dripper system can be a useful, low-cost way to water many potted plants, especially during hot weather or a short time away. But it does not work equally well for every plant.
The main risk is treating one bottle size, hole size, and drip speed as universal. A basil plant in a sunny balcony pot may benefit from steady moisture, while a cactus in a cool room may rot if water drips into its soil for hours. Used well, bottle drippers are practical. Used carelessly, they can cause soggy soil, dry pockets, clogged holes, algae, mosquitoes, or root damage.
Do Plastic Bottle Drippers Work for Every Potted Plant?
No. Plastic bottle drippers work for many potted plants, but not all. Success depends on plant water needs, pot size, drainage, potting mix, weather, season, and drip speed.
Think of a dripper as a temporary or supplemental watering tool, not a replacement for checking soil moisture. It helps only when the plant wants slow moisture and the pot can drain excess water.
Best suited plants
Plastic bottle drippers usually work best for plants that prefer evenly moist, but not waterlogged, soil.
Good candidates include:
- Basil, parsley, cilantro, mint, and leafy herbs
- Lettuce, spinach, chard, and other leafy greens
- Tomatoes, peppers, and cucumbers in larger containers
- Moisture-loving houseplants in well-draining mix
- Flowering annuals such as petunias or impatiens
- Young vegetables in warm weather
These plants often suffer when container soil swings from wet to bone dry. A slow drip can reduce those swings, especially outdoors. The key is well-draining soil. Even moisture is not the same as standing wet soil, and a pot with no drainage hole is a poor match.
Plants that need extra caution
Some plants can use a bottle dripper, but only after careful testing.
Use caution with:
- Orchids
- African violets
- Ferns in small pots
- Calatheas and other sensitive tropical plants
- Seedlings
- Shallow-rooted plants
- Self-watering pots
- Plants already showing yellow leaves or soft stems
These plants may be sensitive to crown rot, soggy roots, or uneven moisture. Orchids in bark often need thorough watering and airflow rather than a constant trickle. African violets dislike water sitting in the crown. Test while you are home, then check the soil after several hours.
Plants that usually need a different watering method
Some potted plants are usually poor candidates for slow bottle dripping:
- Cacti
- Many succulents
- Lithops and other “living stone” plants
- Rosemary and lavender in cool conditions
- Plants in dense, peat-heavy soil
- Pots without drainage
- Plants with root rot or fungus gnat problems
Succulents and cacti generally prefer a soak-and-dry pattern: water thoroughly, then let the mix dry well. A dripper can keep moisture lingering too long, especially indoors or in cool weather.
How a Plastic Bottle Dripper System Works
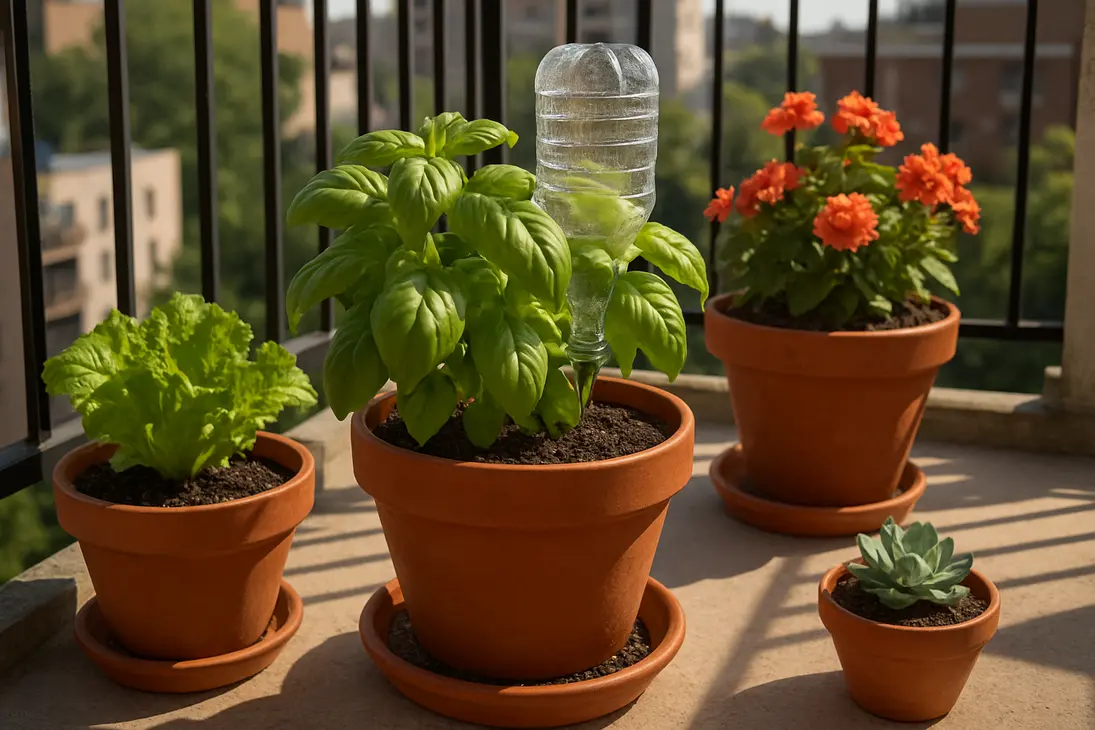
A plastic bottle dripper uses gravity, small holes, and air pressure to release water slowly into soil. The simplest version is an upside-down bottle with a pierced cap. As water drips out, air enters the bottle and allows more water to leave.
Unlike normal watering, a dripper concentrates moisture in one area. That can help the root zone, but it can also leave parts of a large pot dry if the mix does not wick moisture well.
Upside-down bottle with a pierced cap
The classic method is:
- Fill a clean plastic bottle with water.
- Pierce one small hole in the cap.
- Turn the bottle upside down.
- Support the neck near the soil surface.
- Let water drip slowly into the pot.
Some gardeners cut off the bottom for easy refilling. The main challenge is flow control: a tiny-looking hole can drain a bottle in minutes, while a too-small hole may clog or stop once soil presses against it.
Buried bottle beside the roots
Another method is to bury part of the bottle in the pot with holes along the lower sides. Water is poured into the top and seeps into the surrounding soil.
This can work in large outdoor containers because it places water deeper and reduces evaporation. However, buried bottles take up root space, disturb roots, and can clog in dense soil. They are not ideal for small pots.
Bottle-and-tube or syringe-style drip setup
Some DIY systems use a bottle reservoir with a tube, syringe barrel, or small outlet to direct water more precisely.
These setups can improve placement but are more likely to clog, leak, siphon too fast, or fail if the tube moves. Test them before relying on them.
How to Set Up a Plastic Bottle Dripper for Potted Plants
The safest setup is one you test before using unattended. Do not fill a bottle, push it into a favorite plant, and leave for a week without knowing how fast it drains.
Choosing the right bottle size
Match bottle size to pot size and plant demand. Bigger is not always better.
| Pot or plant situation | Bottle size to test first |
|---|---|
| Small indoor pot, 4–6 inches wide | 250–500 ml |
| Medium herb or houseplant pot | 500 ml–1 liter |
| Large patio pot | 1–2 liters |
| Very large outdoor container | Two smaller bottles |
A large bottle in a small pot can tip, compact soil, or release too much water. In wide pots, two smaller drippers often water more evenly than one big bottle.
Making the drip hole
Start with one small hole in the cap using a pin, needle, small nail, or drill bit. Make it smaller than you think you need; you can enlarge it, but you cannot shrink it.
If water does not flow, widen the hole slightly or add a second tiny hole. Some bottles need a tiny air hole in the base so water flows steadily. If the bottle drains too fast after adding air, cover part of the air hole with tape and retest.
Positioning the bottle in the pot
Place the drip point near the active root zone, not against the stem. For most plants, that means a few inches from the main stem and slightly toward the center of the pot.
Avoid:
- Pressing the cap into compacted soil
- Dripping directly onto the crown
- Placing the outlet at the pot edge
- Using a heavy bottle that leans on stems
- Using any dripper in a pot without drainage
If soil blocks the cap, lift it slightly with a small stone, mesh, or piece of broken terracotta.
Testing the flow rate before regular use
Test over a sink or spare pot first, then in the actual plant while you are home.
Check:
- How long the bottle takes to empty
- Whether the soil becomes soggy
- Whether water reaches the lower root zone
- Whether water runs straight out of the drainage holes
- Whether the bottle collapses or stops
- Whether the plant looks normal the next day
For many potted plants, a useful dripper empties over several hours, not minutes. For vacation use, it may need to last a day or more. There is no single correct timing because plant size, weather, and soil mix change everything.
Matching the Dripper to the Plant, Pot, and Soil
A plastic bottle dripper works best when adjusted to the plant and container. Treat it as a tool to tune, not a fixed recipe.
For herbs, leafy plants, and vegetables
Leafy herbs and vegetables are often good matches because they need steady moisture. Basil, cilantro, parsley, lettuce, and spinach can wilt quickly in small outdoor pots.
For these plants:
- Use a small to medium bottle.
- Place the drip near roots, not on the stem.
- Keep soil moist, not muddy.
- Check daily in hot weather.
- Use more than one dripper for wide containers.
Tomatoes, cucumbers, and peppers may benefit from slow watering, but mature plants in summer often need more than one small bottle. In that case, the dripper supplements regular watering rather than replacing it.
For succulents and drought-tolerant plants
Succulents need caution because a dripper often delivers water in the wrong pattern. Most prefer gritty, fast-draining mix, excellent drainage, deep but occasional watering, and drying time between waterings.
A slow drip can keep soil damp too long and encourage rot. If you try one, use a very small amount of water only in warm, bright conditions, then remove it once the soil is lightly moistened. For most indoor succulents, hand watering is safer.
For large pots and outdoor containers
Large outdoor pots dry unevenly. One side may be hot and dry while deeper soil stays moist.
For large containers:
- Use two or more smaller drippers.
- Place them on opposite sides.
- Test after a sunny day, not only in cool morning conditions.
- Mulch the surface to reduce evaporation.
- Water by hand first if the pot is extremely dry.
Bottle drippers may not be enough for hanging baskets or patio tomatoes in a heat wave. These may need daily watering, a proper drip line, or a self-watering container.
For small pots and shallow-rooted plants
Small pots are easy to overwater because they have little soil volume to buffer mistakes.
For small pots:
- Use the smallest bottle available.
- Make the smallest practical hole.
- Test for hours, not days.
- Avoid heavy bottles that tip the pot.
- Skip the dripper if the plant already dries slowly.
Shallow-rooted plants may also suffer if water goes too deep or stays in one narrow spot. A small watering can may be better.
Common Problems, Safety Concerns, and Fixes
Most problems come from flow rate, soil texture, or using a dripper on the wrong plant.
The bottle drains too fast
If the bottle empties in minutes, the hole may be too large, too much air may be entering, or the outlet may be acting like a pour spout.
Try:
- Starting again with a new cap and smaller hole
- Using only one hole at first
- Avoiding squeezing the bottle during insertion
- Checking for cracks in the cap
- Raising the outlet slightly
- Testing a smaller bottle
If water runs straight out of the drainage holes, the soil may be hydrophobic or the outlet may be at the pot edge. Water slowly by hand first, then use the dripper to maintain moisture.
The bottle barely drips or clogs
If the bottle does not drip, the hole may be blocked by soil, too small, or sealed by vacuum pressure.
Try:
- Rinsing the cap hole
- Lifting the cap slightly off the soil
- Adding a tiny air hole
- Filtering dirty rainwater or compost tea
- Avoiding sediment-heavy fertilizer mixes
- Using mesh or a small stone to keep soil away from the hole
Clogging is more common in fine, dense, or very peaty mixes.
Soil stays too wet
Wet soil is the most serious problem because roots can be damaged before symptoms are obvious.
Warning signs include:
- Yellow lower leaves
- Wilting despite wet soil
- Musty smell
- Fungus gnats
- Soft stems near the soil line
- Algae or green film
- A heavy pot that stays wet for days
Stop using the dripper until the pot dries to the right level for that plant. Check drainage holes. If the pot has no drainage, do not use a bottle dripper. If the mix stays wet too long, repotting into a better-draining mix may be safer than adjusting the bottle.
Concerns about plastic leaching
Many gardeners reuse clean food-grade drink bottles for short-term drippers, including around edible plants. Still, plastic degrades in heat and sunlight. Avoid bottles that are brittle, cloudy, cracked, oily, strongly scented, or previously used for non-food chemicals.
For edible plants:
- Use only clean food or water bottles.
- Avoid bottles that held cleaners, pesticides, fuel, or unknown liquids.
- Keep bottles out of intense sun when possible.
- Replace damaged bottles.
- Do not heat plastic bottles to reshape them.
- Use terracotta spikes, glass reservoirs, or drip irrigation if you prefer non-plastic options.
A plastic bottle dripper is best as a temporary reuse item, not a permanent fixture left in sun for years.
Reusing bottles responsibly
Reusing bottles can reduce waste, but do not let old plastic break into potting soil. Remove shedding labels and wash bottles between uses, especially if algae forms.
To reduce algae and mosquitoes:
- Keep refill openings covered.
- Do not leave open water standing.
- Place bottles out of direct sun when possible.
- Empty and clean bottles between trips.
- Remove unused drippers.
Recycle cracked or brittle bottles where local facilities accept that plastic.
Conclusion
A plastic bottle dripper system can work well for many potted plants, especially thirsty herbs, leafy greens, flowering annuals, and large outdoor containers that dry quickly.
But it is not universal. Succulents, cacti, plants in dense soil, pots without drainage, and sensitive houseplants may do better with hand watering or a more controlled irrigation method.
The safest approach is to match the bottle to the plant, pot, and soil; start with a very small hole; test the flow while you are home; and adjust before trusting it unattended.
FAQ
Can I use a plastic bottle dripper while I’m away on vacation?
Yes, but test it several days before you leave. Check how long it takes to empty and how wet the soil stays afterward.
It may work for short trips with herbs, leafy plants, and outdoor containers. For longer vacations, valuable plants, succulents, or sensitive plants may be safer with a plant sitter, self-watering pot, or proper drip system.
How big should the hole in the bottle cap be?
Start with the smallest hole you can make using a pin, needle, or very small nail. Test before enlarging it.
There is no perfect size because bottle shape, air pressure, soil contact, and potting mix all affect flow. If it drains too fast, use a new cap. If it barely drips, widen the hole slightly or add a tiny air hole.
Are plastic bottle drippers safe for edible plants?
For short-term use, many gardeners reuse clean food-grade water or soft drink bottles. Avoid containers that held chemicals, and replace bottles that are cracked, brittle, or sun-damaged.
If you are concerned about plastic near food crops, use terracotta watering spikes, glass reservoirs, or a standard irrigation system.
Can succulents use a plastic bottle drip system?
Usually, succulents are not the best match. They generally prefer thorough watering followed by a dry period, not slow ongoing moisture.
A very limited dripper may work briefly for a large outdoor succulent in hot, fast-drying conditions, but test carefully. For most indoor succulents, hand watering is safer.
You Might Also Like