How to Prepare a Bonsai Container and Move a Plant Safely
Moving a plant into a bonsai pot is more than changing its appearance. A bonsai container is shallow and less forgiving than a nursery pot, so preparation affects drainage, root health, stability, and recovery.
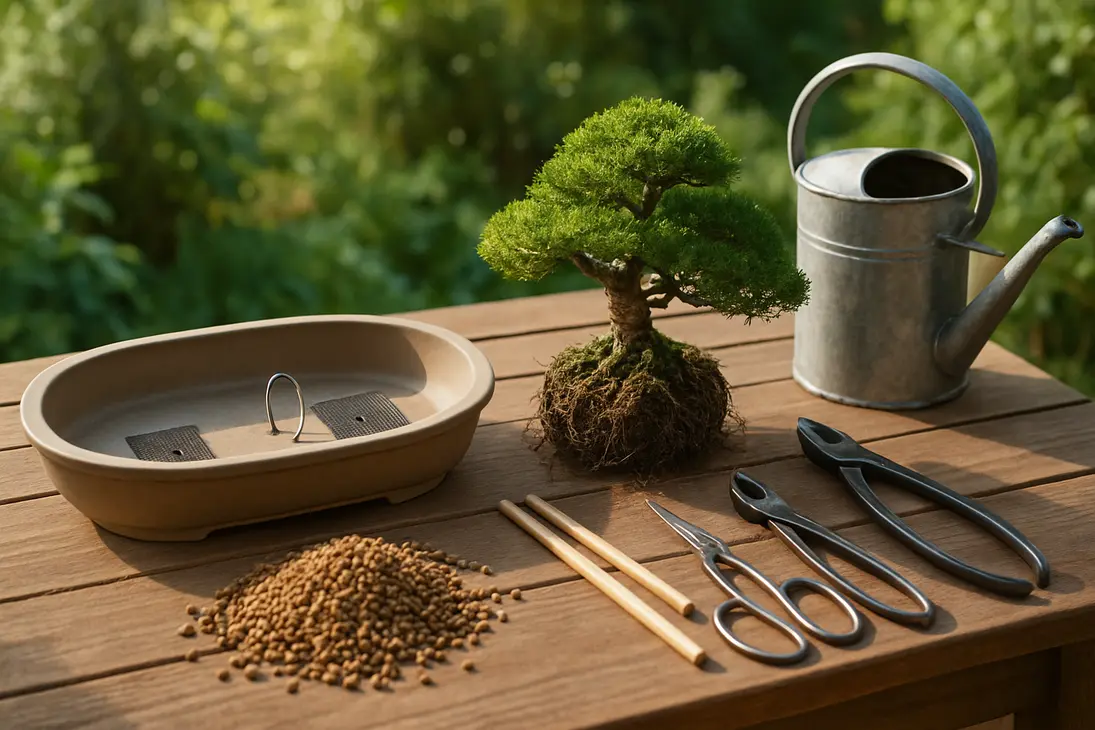
Before removing the plant, prepare the pot, mesh, wire, soil, tools, and water. Once roots are exposed, work efficiently and keep them from drying.
Choose the Right Bonsai Container Before Transplanting
A bonsai container should support the tree’s health first and its design second. It must be large enough for the roots you plan to keep, heavy enough to stabilize the tree, and open enough to drain freely.
Very shallow display pots are not always the best first choice. Young nursery plants, weak trees, recently collected material, and plants with large root balls often recover better in a training pot before moving into a refined container.
Match container size to the plant and root system
Choose the pot according to the tree’s strength, root mass, and stage of development. A common mistake is moving a nursery plant directly into a shallow ceramic pot while removing too many roots. The tree may look like bonsai, but may not have enough roots to support its foliage.
The remaining root system should fit with a thin layer of soil below and around it. If you must sharply bend thick roots, force the root ball flat, or remove most roots to make the plant fit, the container is too small for now.
Use a training pot or deeper bonsai container for young nursery plants, weak trees, newly collected plants, or large root balls. Use a wider, heavier pot for top-heavy or slanted trees. Shallow pots are more suitable once the tree has a compact root system and enough fine feeder roots.
Style matters, but not more than survival. Upright trees often suit oval or rectangular pots, softer informal styles often suit rounded or oval pots, and cascade styles usually need deeper containers. If the tree is not ready, use a training container first.
Check for adequate drainage
A bonsai pot should have at least one generous drainage hole; larger pots often have two or more. Make sure holes are not blocked, glazed shut, or too small to drain well.
Before planting, pour water through the empty container. It should run out freely. If water pools or drains slowly, clear the holes or choose another pot. In shallow containers, soggy soil quickly weakens roots.
Consider whether the plant is suitable for bonsai
Not every plant belongs in a bonsai container. Good candidates tolerate pruning, respond to root management, produce compact growth, and can live in a restricted root environment.
Beginner-friendly options include ficus, Chinese elm, juniper, jade plant, dwarf jade, cotoneaster, boxwood, and some maples, depending on climate and care. Tropical species such as ficus may suit indoor growers with strong light. Temperate species such as junipers generally belong outdoors.
Start with a healthy plant that suits your growing conditions. A declining plant should usually recover before root pruning or repotting into a bonsai container.
Prepare the Container, Mesh, Wire, and Soil
Prepare everything before lifting the plant from its old pot: container, drainage mesh, wire, bonsai soil, chopsticks or a similar tool, root scissors or shears, and water.
Clean or sanitize the container
Rinse a new container to remove dust and grit. Scrub a used container to remove old soil, algae, and mineral deposits, especially around drainage holes and corners.
If the pot held a diseased plant, wash and disinfect it with a suitable household method, then rinse well and let it dry. Check for cracks, since a damaged pot may fail when wired, moved, or exposed to freezing weather.
Cover drainage holes with mesh
Cut plastic or metal bonsai mesh slightly larger than each drainage hole. The mesh should keep soil from washing out without blocking water flow.
Secure it with a short wire clip. A U-shaped or butterfly-shaped wire passed through the mesh and bent underneath the pot works well. Avoid materials that decay quickly, clog the hole, or act like a plug.
Add anchor wire if needed
Most newly potted bonsai should be anchored, especially in shallow pots or after root reduction. A tree that rocks in wind or during watering breaks new root tips as they form.
Thread aluminum or copper wire through drainage holes or wire holes before adding soil. Leave enough length inside the pot to cross over the root ball and twist later.
Use a fast-draining bonsai soil mix
Regular potting soil is usually too fine and water-retentive for shallow bonsai pots. It compacts, limits air, and can keep roots wet too long.
Use a granular bonsai mix that drains freely while holding some moisture. Common components include akadama, pumice, lava rock, expanded shale, coarse grit, and sometimes pine bark. The best mix depends on species, climate, and watering habits.
For beginners, a reliable premixed bonsai soil is usually safer than garden soil or houseplant mix. If mixing your own, screen out dust and very fine particles because they settle and reduce drainage.
Prepare the Plant for Its Bonsai Container
Root work is the most sensitive step. The goal is not to strip the plant bare or force it into a tiny pot, but to reduce, arrange, and refresh roots enough for healthy growth.
Timing depends on species. Many temperate deciduous trees are repotted in late winter or early spring as buds swell. Many tropicals are repotted during warm active growth. Conifers often need more conservative root work and careful timing.
Remove the plant gently from its old container
Watering the day before can make removal easier. Support the trunk near the soil line and ease the plant out. Squeeze flexible nursery pots if needed. If roots are stuck through drainage holes, free or trim them instead of pulling hard.
Nursery plants may have circling roots against the pot wall. Older bonsai may have dense mats of fine roots. Work slowly to avoid tearing roots you want to keep.
Loosen and inspect the root ball
Examine the roots after removal. Healthy roots are usually firm; dead or rotten roots may be black, mushy, hollow, or sour-smelling. Remove clearly dead material.
Use a chopstick, root hook, or fingers to loosen the outer and lower root ball. Start at the edges and work inward. For a first move from a nursery pot, you may not need to bare-root the whole plant unless the old soil is compacted or waterlogged.
Look for the main root structure near the trunk base. Surface roots, or nebari, help create the visual foundation of bonsai, but they do not need to be perfected in one repotting.
Trim damaged, circling, or overly long roots
Use clean, sharp scissors or root shears. Remove dead, damaged, circling, straight-down, or awkwardly long roots first. Keep as many fine feeder roots as practical because they absorb water and nutrients.
Be conservative if the tree is weak, newly collected, a conifer, or being moved from a nursery pot for the first time. If the root ball is far too large, use a training pot and reduce roots gradually over future repottings.
Keep the roots from drying out while you work
Exposed roots dry quickly in sun, wind, or warm indoor air. Work in shade or bright indirect light. Mist roots if needed, or cover them with a damp cloth during pauses.
Do not leave a plant bare-rooted while you take a long break. Fine feeder roots can be damaged by drying even when thicker roots still look healthy.
Position, Secure, and Fill the Bonsai Container
With the pot prepared and roots trimmed, place the tree so it is stable and visually balanced.
Add a base layer of soil
Add a thin layer of bonsai soil to the bottom of the container. In deeper training pots, this layer can be more generous; in shallow pots, use only enough to support the roots and improve contact.
Some growers make a small mound under the trunk so roots spread outward and slightly downward. Do not add a separate gravel drainage layer. A consistent granular mix usually manages water better in a shallow pot.
Position the tree for balance and viewing angle
Set the tree in the pot and check it from several angles. Bonsai are often placed slightly off-center, especially in oval or rectangular containers. The best position depends on trunk movement, branch direction, surface roots, and the intended front.
Adjust soil under the root ball until the trunk base sits at the right height. Surface roots should be near the final soil level, not buried deeply or exposed so high that they dry out.
Spread roots naturally across the soil
Arrange roots outward over the soil. Do not twist them into tight circles or fold thick roots sharply to make them fit. Shorten roots that cannot be placed naturally.
Radial roots improve stability and appearance over time. If one area has fewer roots, later work soil carefully into gaps so empty pockets do not dry out.
Secure the tree with wire
Bring anchor wires over the root ball and twist them firmly. The wire should stop movement without cutting into major roots or the trunk. If needed, protect sensitive roots with tubing, rubber, or folded mesh.
Gently move the trunk to test stability. The tree and pot should move as one. If the trunk wobbles independently, tighten or reposition the wire.
Fill with soil and work it around the roots
Add bonsai soil gradually. Use a chopstick to work soil into gaps by pushing down and wiggling gently. The goal is to remove air pockets without crushing fine roots.
Fill until roots are covered and the surface is level or slightly mounded. Leave a little space below the rim so water can soak in. Do not compact the soil hard; it should settle around roots while keeping air spaces between particles.
Watering, Recovery, and Common Mistakes to Avoid
After potting, the tree needs moisture, stability, light, and protection from stress. Do not rush fertilizer, strong sun, or extra pruning.
Water thoroughly after transplanting
Water immediately after repotting with a gentle stream or fine rose. Continue until water runs freely from the drainage holes. This settles soil around the roots and helps flush dust from the mix.
Afterward, monitor moisture instead of watering by a fixed schedule. Bonsai containers dry faster than nursery pots, but reduced roots can also suffer if kept constantly wet. Water when the mix is beginning to dry.
Keep the tree sheltered while it recovers
Place the tree out of strong wind and harsh midday sun. Bright shade or morning sun with afternoon protection suits many species during early recovery. Tropical plants should stay warm; temperate outdoor trees should usually remain outdoors but protected from extremes.
Shelter does not mean darkness. The tree still needs light, but intense sun can pull water from foliage faster than disturbed roots can replace it.
Avoid fertilizing immediately after repotting
Wait until the tree shows signs of recovery before fertilizing. Fresh root cuts are not helped by strong fertilizer, and a stressed tree may not use nutrients efficiently. In many cases, waiting several weeks or until new growth is active is safer.
Do not remove too many roots at once
Over-pruning roots is a common bonsai mistake. If too much root is removed, the plant may wilt, drop leaves, stall, or die back.
Develop the root system in stages. Start with health and structure in a training pot if needed, then move to a shallower container later. When unsure, prune less; you can reduce more at the next suitable repotting.
Avoid using regular potting soil in shallow bonsai containers
Standard potting mix often holds too much water, collapses over time, and limits oxygen in shallow pots. It may stay wet inside while the surface looks dry, or shrink away from the pot edges when dry.
Use a granular bonsai mix suited to the species and container depth. It does not need to be exotic, but it should drain freely and resist compaction.
Make sure the tree receives the right light for its species
A bonsai pot does not change a plant’s light needs. Junipers, pines, many maples, elms, and most temperate woody bonsai are outdoor plants. They usually decline indoors.
Ficus and some tropical species can grow indoors, but they still need the brightest practical location, such as a sunny window or grow lights. Poor light leads to weak growth, leaf drop, long internodes, and slow recovery.
Conclusion
Safe bonsai container preparation starts before the plant leaves its old pot. Choose a container that fits the current root system, drains freely, and can hold the tree stable. Cover holes with mesh, install anchor wire, and use fast-draining bonsai soil.
Remove the plant gently, inspect and loosen the roots, prune conservatively, and keep roots moist. Position the tree thoughtfully, secure it firmly, and work soil into gaps. After repotting, water thoroughly and provide protected recovery. Bonsai develops gradually; a healthy tree in a suitable container is better than a stressed tree forced too quickly into a shallow pot.
FAQ
What is the best soil to use in a bonsai container?
Use a fast-draining, granular bonsai mix that holds some moisture while allowing air to reach the roots. Common ingredients include akadama, pumice, lava rock, expanded shale, coarse grit, and sometimes bark.
Avoid garden soil and most standard potting mixes in shallow bonsai containers because they compact and stay wet too long. Beginners are usually safest with a quality premixed bonsai soil.
How much root can I trim when moving a plant to a bonsai pot?
It depends on the species, season, health, and amount of fine root remaining. Healthy deciduous trees often tolerate more root pruning than conifers or weak plants, but caution is still best.
Remove dead, damaged, circling, and overly long roots first. If the plant would need most roots removed to fit, use a larger training pot and reduce the root system gradually.
Should I water a bonsai immediately after repotting?
Yes. Water thoroughly until water runs from the drainage holes. This settles the soil and helps remove dust from the mix.
After that, check moisture regularly and water when the mix begins to dry. Newly repotted trees need careful watering while roots recover.
Can any plant be moved into a bonsai container?
No. Many woody plants can be trained as bonsai, but not all plants are suitable. Good candidates tolerate pruning, adapt to container culture, and match your growing conditions.
A ficus may work indoors with strong light, while a juniper usually needs to live outdoors. Do not force a weak or unsuitable plant into a shallow pot just for appearance.
You Might Also Like